| By John Trout Although none of the following tips and methods are new, they’ve all been verified and found to be very rewarding. Perhaps one of the most important steps I’ll discuss is the application of a seal, where a viscous epoxy is applied over the mouth of a crack so that resin can be injected under pressure into the crack through a series of parts. Other important tips I’ll impart include injection and quality-control techniques that can help get the job done quickly and correctly. As with most things in life, some of these methods will require an initial investment of time and resources, but their use will produce benefits that far outweigh their initial costs.
|
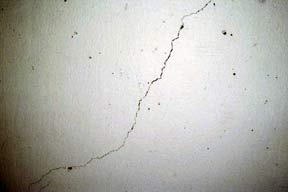
 Fig. 1: A minimum seal depth of twice the width is important to avoid faiIure of the surrounding concrete
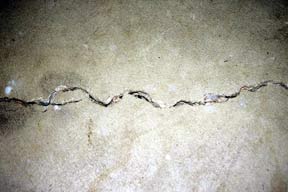 Fig. 2: The width (> 0.088 in. [2.2 mm]) and cleanliness of this crack make it an ideal candidate for packing
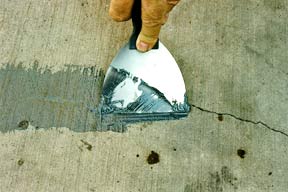 Fig. 3: Packing the epoxy into place with a flexible metal spatula
 Fig. 4: Diagram of a routed crack with the seal and injection ports installed |
|
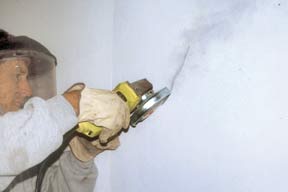 Fig. 6: Chasing the crack with a 4-in. (100-mm) diamond blade to produce a 3/8-in. (10-mm) deep groove |
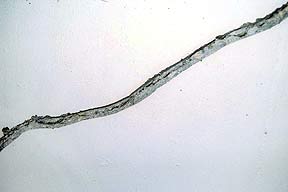 Fig. 7: Routing avoids the need to remove paint that would be required to place a cap |
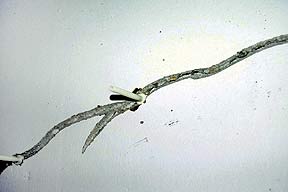 Fig. 8: Ports are installed prior to applying the seal |
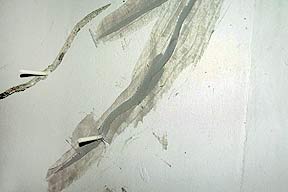 Fig. 9: The resulting flush seal eliminates the cost of removing a cap |
APPLY A SCRUB COAT (Fig. 10 to 12)
Because a limited number of cracks meet the criteria for packing, and because the dust generated by routing is often objectionable, the cap remains the most common seal. Unfortunately, it’s also the most likely to leak. Caps leak for many reasons, but most leaks occur because the epoxy doesn’t get a grip on the concrete. An epoxy, like any other adhesive, must be able to penetrate into the surface (to wet the substrate) in order to get a grip.
To help wet the substrate, use a stiff-bristled Tampico brush to scrub a coat of the epoxy-capping adhesive into the surface along the path of the cap. Besides wetting the surface, scrubbing also improves the bond by working some of the sealer into the crack. Further, scrubbing of the epoxy into the concrete pores can help to compensate for a stiff epoxy that results form working at low temperatures or using an epoxy that is nearing the end of its working life. Before the scrub coat becomes tack-free, apply the additional epoxy needed to shape the cap.
 Fig. 10: No problem has so vexed the injection craft as much as leaking seals during injection |
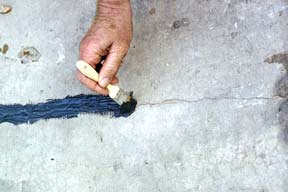 Fig. 11: A stiff-bristled Tampico disposable brush works well for applying the scrub coat |
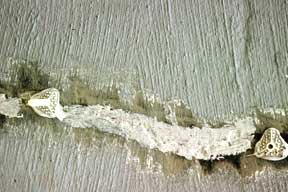 Fig. 12: A typical scrub coat application following porting |
USE INSERTION PORTS (Fig. 13 to 14)
If a crack is at least 1/8 in. (3-mm) wide, simply insert a segment of a nylon tube into the crack. Three-inch (76mm) long segments are usually sufficient. Tubing, and the fittings needed to connect injection equipment to the tubing, are available in outside diameters of 1 /8 , 5/32, and 1/4 in. (3, 4, and 6 mm). Segments are a fraction of the cost and can withstand higher pressures than most other porting adapters.
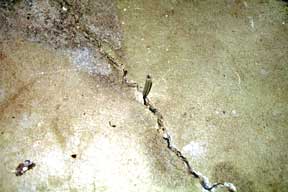 Fig. 13: Cracks that are at least 1/8-in. (3-mm) wide are candidates for insertion porting |
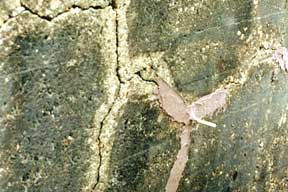 Fig. 14: An insertion port is secured with capping material |
TEST FOR LEAKS (Fig. 15)
Repair leaks before, rather than during, injection. Prior to injection, temporarily cap off all, of the porting adapters, then inject air at high pressure. The optimum spacing between air connections will depend on the crack width, but air is typically injected into every tenth port. Any leak large enough to allow resin to escape will vent sufficient air to be felt with a bare hand (and probably heard as well). Mark the leaks, repair them with a rapid-setting epoxy, and continue with injection shortly thereafter. This process costs little, yet assures a leak-free setup.
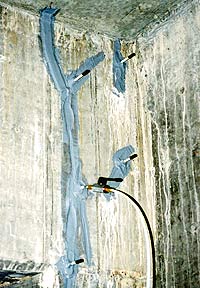 Fig. 15: Leaks in a crack seal are quickly located by injecting air into the crack |
USE A HYDRANT (Fig 16 to 18)
When applying an epoxy gel or paste, it’s often difficult to get the epoxy placed before it stiffens. Because the bond strength of a stiff epoxy is severely reduced (it can’t thoroughly wet into the surface), this is a serious problem. Most leaks occur for this reason. The problem is eliminated by drawing the adhesive from a hydrant. As material is needed, the worker quickly obtains an ideal amount of fresh, precisely proportioned, and thoroughly mixed epoxy.
Clean-up is reduced when an inexpensive disposable mixer is used. There is also a further option to use the hydrant with hoses to apply the sealer directly on the crack. Such equipment is expensive, but some injection dispensers can be easily modified for this purpose. The conversion from injection to faucet or hoses requires less than 30 minutes, depending on the equipment.
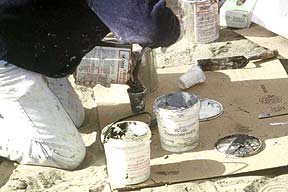 Fig. 16: Manual preparation of resin results in extra cleanup and waste Fig. 16: Manual preparation of resin results in extra cleanup and waste |
 Fig. 17: In contrast, a hydrant can provide fresh, precisely proportioned, and thoroughly mixed seal epoxy Fig. 17: In contrast, a hydrant can provide fresh, precisely proportioned, and thoroughly mixed seal epoxy |
 Fig. 18: Further, a hose attached to a hydrant can be used to apply capping epoxy directly to the crack Fig. 18: Further, a hose attached to a hydrant can be used to apply capping epoxy directly to the crack |
USE HIGH INJECTlON PRESSURES
Although the penetration obtained by injecting resin at 350 psi (2400 kPa) can usually be matched at 50 psi (340 kPa), high pressures fill voids much faster. At 350 psi (2400 kPa), for example, a crack will be satisfied (filled) much more quickly than at 50 or 100 psi (340 or 690 kPa). Even though higher pressures yield a shorter and more profitable project, and even though the most successful injection contractors inject at pressures of at least 300 psi (2100 kPa), many contractors aren’t able to establish a seal and install ports that don’t leak. Therefore, much injection work is still performed at pressures of 100 psi (690 kPa) or lower.
It can be demonstrated that if the techniques and disciplines described here are followed, the seal and ports will withstand injection pressures of over 1000 psi (6900 kPa). It’s simply inexcusable to allow resin to cascade down a wall during injection.
Consider the acquisition of a little more knowledge and equipment to step into high-pressure injection. In addition to faster injection of low-viscosity materials, keep in mind that the equipment can he used to inject gels as well. This is a great advantage on below-grade work where the back side of the wall can’t be sealed.
INSTALL MASTER PORTS (Fig. 19 to 21)
There is sometimes a need to inject cracks in monolithic concrete structures, such as generator foundations. Because cracks that occur in these structures are usually both very narrow and very deep (as much as 6 ft [1.8 m]), it’s difficult to obtain full-depth penetration before the resin begins to gel within the crack, particularly in a warm environment. Although the total volume of resin required to inject such a crack may not be great, the small aperture provided by a conventional, surface-mounted porting adapter is an unwelcome restriction (for example, if a 3/16 in. [4.8-mm] diameter porting conduit is surface-mounted over a 0.007-in. [0.18-mm] wide crack, the resulting opening into the crack is only about 0.0013 in. 2 [0.86 mm 2 ]). Installation of a system of master ports, comprising 2-in. (50-mm) diameter by 5-in. (125-mm) deep cores at 2 to 5 ft (0.6 to 1.5 m) spacing aIong the crack provides a dramatic increase in apertures into the crack. The minimum spacing should be used until experience is gained with this method.
After drilling the cores, allow the holes to dry before blowing out any impacted sIurry from the cracks. Then, roughen the upper wall of the socket to a depth of about 1-1/2 in. (40 mm) and prime the roughened surface with a low-viscosity epoxy resin. Take care not to allow resin to drool over the exposed crack. Next, insert a segment of tubing, extending to the bottom of the socket and protruding a few inches above the surface. Place clean (free of fines), dry pea gavel in the socket, up to the primed surface. While the primer remains tacky, pack a stiff epoxy-mortar cap into place, flush with the surface. The pressurized resin will exert as much as 2000 lb (9 kN) of force against the cap, so take extra care when packing the mortar.
Seal the crack between the sockets with an epoxy gel or paste. After the mortar and sealer have cured, inject the first port. Increase the injection pressure gradually to 600 or 700 psi (4100 to 4800 kPa), and continue applying pressure for 5 minutes after the dispenser has completely stalled. Then, move to the next port. If the dispenser is able to easily maintain pressure on a single port, install a manifold to an adjacent port as well. For best results, select a resin with a very low viscosity, no more than 125 centipoise.
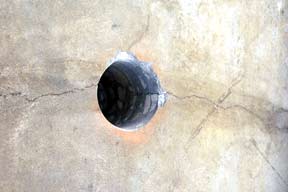 Fig. 19: Two-in. (50-mm) diameter cores work well for master ports |
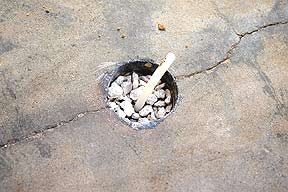 Fig. 20: Clean pea gravel and injection tube are placed in the port, and a stiff epoxy mortar cap is used to seal the top |
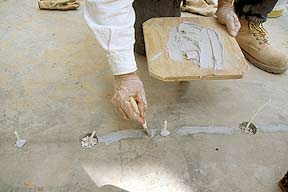 Fig. 21: In preparation for capping the crack, apply a scrub coat between the ports |
USE MANlFOLDS (Fig. 22)
Rather than inject one port at a time, inject numerous ports simultaneously. Nine ports (sometimes as many as 12 ports) are commonly injected at once. Manifolds can be established at the mixer, allowing injection of multiple cracks in the same vicinity, or manifolds can be established at the ends of one or more lines from the mixer, allowing injection at adjacent ports on a single crack.
If the cracks are over 0.02-in. (0.5-mm) wide, they will usually fill quickly. A worker will therefore be kept busy relocating only two or three connections. If the cracks are very narrow, however, injection may take 5 minutes or more. In that case, the leisurely pace will enable a worker to inject at least six ports simultaneously.
Don’t be concerned about entrapping air when injecting adjacent ports — it’s not likely, as concrete is porous and will quickly absorb air, especially when pressurized. I know of no instance of air entrapment due to manifold injection.
Another concern is how to know the crack is filled. It’s impossible to “know,” when the crack is filled when injecting very fine cracks, whether by manifold or one at a time. However, with enough experience, it’s possible to “know” for example, that to fill a 0.009-in. (0.23-mm) wide crack in an 8-in. (200-mm) thick wall at 300 psi (2100 kPa) with a resin viscosity of 160 centipoises at 74 °F (23 °C) will take about 5 minutes. Set up a system where all of the ports are opened simultaneously and left in place for 5 minutes. When the adapters are disconnected, waste a small amount of resin from each valve to prevent gelling of the resin in the lines, and then reconnect the entire battery to another crack segment. Periodically confirm the penetration being achieved by observing bleed on the back side of the element being injected or by taking cores (more on that in the final method).
Manifolding will not necessarily improve the injection results. The same penetration can be achieved by injecting one port at a time. However, because it makes the extended duration necessary for injecting fine cracks affordable, use of a manifold often provides better results. A contractor may not be able to afford to stay on each port for 8 minutes, for example, but if manifolding with six lines, that duration becomes quite affordable.
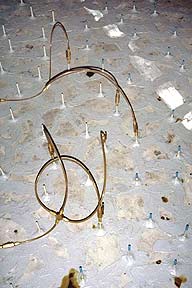 Fig. 22: Injecting one port at a time would make for a very long day. A manifold installed at the end of a line allows several ports on the same crack to be injected simultaneously |
TAKE CORES (Fig. 23 to 25)
Quality control is a four letter word, C-O-R-E. Much could be said about the value of cores to the owner, but my purpose here is to show the value of cores to the workers and the contractor. Unfortunately, there are many workers who have been injecting cracks for 5 years or more, yet have never seen cores taken from their work. They therefore have no reaI confidence in their work and, because they have no confidence in what they are doing, they fear coring.
Without coring, you literally don’t know what you are doing. Personnel that see cores, however, become capable, confident, and cocky. On numerous occasions, I have watched as an experienced injection technician sees, for the first time, a core from his work. Before, he wasn’t sure if he was doing it right (or whether it could be done right). When he sees his first core, however, his face lights up like a little kid and his look says, ‘Wow! Awesome! I did that?”
If a contractor can afford an umpteen dollar epoxy injection machine, then the $2000 needed for the purchase of a core rig and the time taken to obtain routine cores (by the way, with or without the owner’s insistence), are easily-justified training expenses.
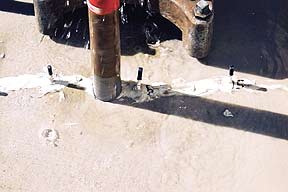 Fig. 23: Cores being taken after completion of injection |
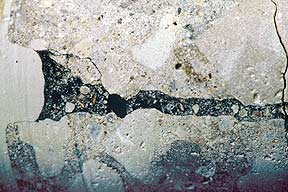 Fig. 24: A core showing the cap at the left and a filled crack running down the center |
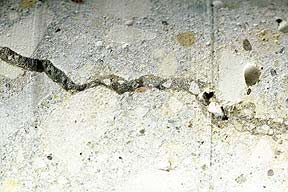 Fig. 25: Further verification |
“This document is a translation of, “Tips for Epoxy Resin Injection,” authored by John Trout and published in Concrete International, Vol. 27, No. 11, Nov. 2005, pp. 44-48.”
